Crochet T-Shirt Rag Rug

I’m on a rug roll. Our hardwood floors are cold (it’s in the teens outside) and it makes me want to cover them all with soft comfy rugs. I’ve certainly got enough material.

DSCN4797

I made this rug for one of Grace’s Christmas presents, making it officially my first rag rug (although I’ve blogged the flannel one before). This is a simple crocheted oval made out of t-shirt yarn. I used single crochet all around and just did increases where I felt it needed it – super informal. There’s a few bubbles because I wasn’t very precise with my increases. That’s really ok though.

DSCN4800

This rug took 7 t-shirts cut into 1.5″ strips. I worked on it for a week or so. Crochet isn’t my first choice of handwork but Shaune hadn’t built my loom yet and I was impatient to make a rug. Grace moves it around her room as she pleases – it is her rug after all. It technically lives by the book shelf, but just sometimes, it makes a lovely monster:

DSCN4801


Flannel Rag Rug

Flannel Rag Rug, or, “Why on earth do we own so many pajama pants?”

DSCN4771

Flannel Rag Rug

This is my first rag rug on the beautiful loom my husband made me. It took just under a week of very distracted work – here a minute, there a minute, pull a bunch out because I messed it up, and another half hour there. Our son has decided he isn’t a particular fan of sleeping so a lot of my rug twining time involved catching the ends out of the hands of a delighted little man. He’s like a cat.

DSCN4765

Just before removing it from the loom

I made this with scrap flannel. Right after Christmas, I was sorting clothes for the family and discovered we own a silly amount of pajama pants, or “fuzzy pants” as we call them. I’m talking easily 20+ pairs between the 3 of us old enough to wear them. It’s a cultural tradition to give new pjs for Christmas and we have whole-heartedly bought into it. I used 8 different flannels in this rug ranging from 6-year-old mostly worn out to brand new scraps from this year’s pair. The varied thicknesses caused the curving you see in the photo above; some of it smoothed out when I removed it from the frame and some will always remain. I’m calling it “character”.

DSCN4764

A bobby pin as a needle makes the last row easier

If you’ve never made a rag rug, the process is fairly simple. It’s the basic over-under-over-under you learned in kindergarten with strips of paper, with a twist – literally. You work with two fabric strips at a time. One goes under while the other goes over, then you twist them before the next warp. As long as you remember to twist the same way every time you end up with a pretty braided effect and a very sturdy woven fabric.

DSCN4770

The edge of the rug – the warp pulls in and hides

The warp for this rug was another scrap from my stash – a cotton printed panel project. Do you know those? You buy the panel which has pattern pieces printed on it, such as a holiday vest. I had a friend bless me with a stack of them. I will never use the projects as designed, but the cotton makes excellent rug warp. I twined the first few rows of the rug out of a coordinating flannel. Once I took the rug off the loom the warp slipped inside and is barely visible. You probably can’t even see it in the photo above.

DSCN4767

Left overs will become warp for the next rug

The left over strips will become the warp for my next rug. There is still so much flannel here…

DSCN4772

All done and in use!

And, done!

Rag Rug Loom

My hubby is awesome.

No, wait, that isn’t the entire post, although it could be! Lately I’ve been obsessed with the idea of making rugs. Specifically, rag rugs. Too much Little House on the Prairie and various other pioneer literature around here lately – makes me want to be all rustic. And as we’re preparing to move cross country, I’m sorting through piles of clothes and my fabric stash to narrow down what will actually be coming with us.

It makes me cringe to throw fabric away. I just can’t.

Enter rag rug making – the perfect way to take unusable fabric and make it usable again. And it uses up lots of it, which I have, thus saving giant heaping piles of clothing from the trash (most of it is too worn out for resale shops).

Last week we drove to Georgia to visit relatives and the entire way my husband and I discussed various loom options. We watched youtube videos at the hotels at night and chatted about what features I wanted. Then we got home and he built it for me using scraps we had around from a shelving project. Total cost? Less than $10 for some oak dowels and the hooks to hold them. And I have fabric for who knows how many rugs.

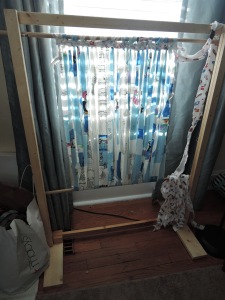
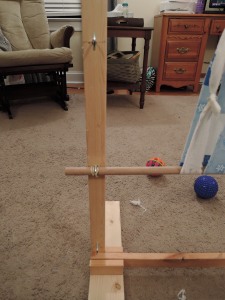
And here it is! Because nothing is better on a cold winter day than weaving at a sunny window.

DSCN4763

Let me show you some of the beautiful details. This loom isn’t taken from any one set of plans, but rather is a hodgepodge of various looms we saw online combined to our own liking.

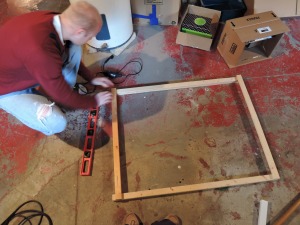
The frame is a basic 2.5′ b y 3.5′. The top and bottom are the same so it can be flipped. It’s made of 1×2″ doubled on the vertical so it’s thick enough to insert hooks:

DSCN4748

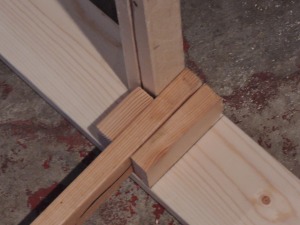
The base is 1×4″ cut 20″ long with more 1×2″ scraps. The frame slips right into it snuggly. He’s going to add a latch to hold the frame in so I can carry it easier, but for now this works.

DSCN4756

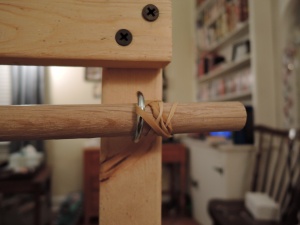
There are 4 sets of hooks on the vertical supports. 5/8″ oak dowels slide in to hold the warp. With this set up I can make a rug any width up to 29″ wide and 3 lengths: 18″, 27″, and 36″ (roughly). For my first rug I’m using the middle (27″) length.

DSCN4759

Dowels are held in place by a super fancy rubber band.

DSCN4758

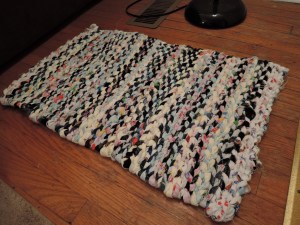
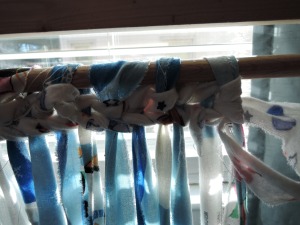
I’m silly excited about this. In the winter, we watch a lot more tv in the evenings. It gets dark here between 4-5pm and it’s really cold. I don’t like just sitting there; this gives me something productive to do that is essentially mindless once I get the pattern going. And look! I’ve already begun. I’ll post more details on this rug as it shapes up. It’s going to be a hug for our feet, all made up of scrap flannel.

DSCN4762

Any one else rag rug? I’d love to geek out with you in the comments if you do!

Crafting the Christmas Story

For the past several years, I’ve been somewhat disillusioned about Christmas. I’m sure you’ve heard it – “Christmas is for kids.” Whether that’s true or not, it’s how I’ve felt. After getting married and having Grace, we’ve waffled back and forth on what role we want Christmas to have in our family. I’m sure it’ll be an annual conversation, but for this year we wanted to focus in on the Bible story and actually celebrate!

Which sent me into the crazy twilight zone that is Pinterest, where I was promptly overwhelmed. I thought about combining a little of this; doing a little of that; modifying the creepy elf thing; calenders, paper chains, oh my! And then a friend pointed me to Truth in the Tinsel. It’s like the best parts of what I was trying to create, except already created! (which was good, since it was already December 3 at this point).

Every day, there’s a short Bible story focusing in on one aspect of the Incarnation – Christ coming to earth as a man. Each scripture passage is used at least 2 days to really drive it home. Then, there is a simple ornament craft to help you remember that element of the story. We collected the ornaments on a small 3′ tree I call our “touch tree” – Grace can’t touch the big tree so I redirect her to the little one to play with as she pleases.

new tree

It was such a blessing to share this experience with our friends who join us 3 days a week. The big girls get each other all excited as we do the Bible story. They each remember different parts of it so by the end of each lesson we’ve covered all of it. Even the little guy happily joined us as we sang various Christmas carols – Joy to the World is the smash hit of 2013! I love how every time we reviewed, they knew exactly what each symbol on our calendar meant and how it pointed to Jesus. Same with each ornament. For the calendar, the green square symbols are included with the ebook. My husband made the number circles in PSE. The board was a hideous painting that I covered with wrapping paper. I may post a quick tutorial later this week.

calendar

And what did we make? A mess, mostly, of paint and glitter and straw and yarn. Fuzzies from cut pipe cleaners. Broken crayons. And lots of lovely memories! We didn’t get to every ornament this year, partly due to scheduling and partly due to ages (1.5, 2.5, 3.5 years old), but I have every intention of doing the program again in 2014. And then the little hands will be better equipped to tackle some of the ornaments. All the same, I’m super thrilled with our collection! 12 out of 24 ornaments isn’t bad, and we actually hit about 16 of the lessons through combining.

ornament collage copyFrom left to right: Row 1 – The sun; a crown; Mary and Joseph; Row 2 – a CD (for Mary’s song in Luke 1); 3 wise men; zzz (Joseph dreams of Gabriel), a candle; Row 3 – The angel Gabriel; the stable; a sheep; Bottom middle – Baby Jesus in the manger

Now that Christmas is over, I’m a little torn about not having an activity and a lesson all laid out each day. I may keep some of them up in Grace’s room as decorations. One thing I won’t miss though – glitter all over everything! (Though I did see something on the author’s blog of Truth in the Tinsel that she’s got a non-seasonal lesson guide… so we might be right back at it again soon!)

Autumn Friends

Grace has hit the collecting stage. No matter where we go, she picks up little found objects to carry home as treasures. So it wasn’t surprising yesterday after spending two hours at the park that the stroller was completely full of bits and pieces that just HAD to come home with us:

10 2013 091

And as I was looking at this collection overrunning my counter, I decided to get crafty! For at least a year now, I’ve had my eyes on Waldorf-inspired toys on Pinterest. I’ve read a good bit of the philosophy and decided that Waldorf isn’t the right fit for our family. However, some of their perspective on toys is right up my alley! Simple and natural with a big emphasis on open-ended play. Open-ended toys can be played with in many ways and hope to inspire imagination. One of my favorite Waldorf-inspired toys is peg people. And so finally, Grace has her very own set:.

10 2013 092

It’s surprising how expressive 2 little dot eyes can be!

10 2013 093

This are ridiculously easy. I picked up some doll pins and doll pin stands at my local craft store. The paint I already had. The eyes are black permanent marker. And the acorn caps are collected! I forgot my coupons so I had to pay full price, but even still, the dolls cost about $0.40 each. If you remember your coupons they’re even cheaper.

10 2013 103

Grace painted one herself while I made the rainbow set:

10 2013 095

And I couldn’t leave the perfect acorns alone. They became little friends to join the party 🙂 (paint pen and permanent marker)

10 2013 098

I may have gotten carried away a little bit. But since everything was already in my house, why not? I turned a tray from a Melissa and Doug set into a doll house by slipping scrapbook paper in each side. It isn’t attached, just tucked in, so that the paper can be changed on a whim. The flowers are the garden of course!

10 2013 101

I have at least one or two more ideas for the collected bits, like an acorn cap matching game. There’s 23 doll pins left and I have already designed 4 more based on the characters from Grace’s favorite book series. I’m really loving these nearly-instant gratification craft projects! It’s a nice change from the weeks-long, hours of work, sewing projects I’ve been doing lately.

What are you crafting this fall? I’d love to see!

10 2013 100